updates To light
I have finished this project. I enjoyed making this piece and I like how it came out. there were a few changes that I made as I went to make this work and what I had available to me.
To Hang
For this, I had to change a few things to make my piece in the remaining time I had. I still went with my original design or outlook of what I wanted. I did not end up doing Steel Damascus. However, I still wanted to have that Damascus look or feel. So I primed up my piece of steel with paint primer. Once it was formed (cold forging), I scratched outlines on the paint to expose the steel and dipped it in ferric chloride to etch the metal. In doing this, the lines would be smoother and facilitate the process and labor required. Once it was done etching in the ferric chloride (fourth and 5th picture) I removed the primer and placed a black acrylic wash over the steel with heat. It was then buffed and polished out to remove acrylic on the flat surface of the steel and remain in the etched lines. However, the lines I made are more stylized Damascus rather than true Damascus patterns. If I could I would do this again with real Damascus, or increase the number of lines and look at a pattern to make it look more like Damascus.
To Pull
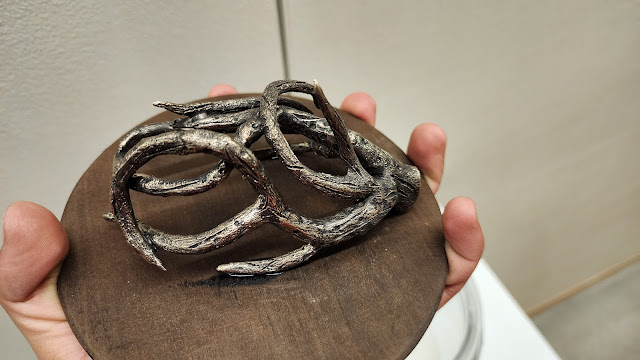
When I started to work on this piece I changed the original plan of what I wanted to do. this was because I was running out of time, but to also fulfill the project requirements or objective better (primary function vs secondary like my to light). I would say that the black patina and polish work with this piece and with the darker lid I made works together to not pull too much from the main piece or component. In the photos, I have not sealed it yet, but I did seal it before it was properly displayed.
TO PULL
Update from top to bottom. Where are you now and what is left.
I got inspiration from the fanlight in my house and the light in my house. I wanted to add to it by making a little piece that you can pull on instead of it just being a chain or a ball at the end of a string.
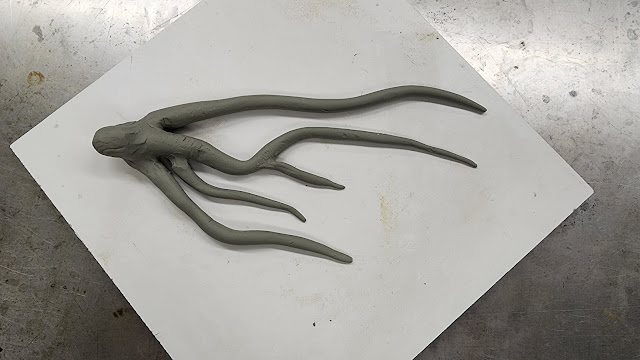
I went with this type of design because I wanted to continue a similar style to a previous bronze casting that we did for sculpture one, but I wanted to add to it a bit more by having designs in between the stems. I like curvilinear forms or organic forms, and I also like sharper forms or shapes. some of the patterns I'm taking from a previous piece I made by stippling
Now after class I have heard that many are interested in doing something for a light pull, I will try and work out what else I can do. What I was thinking was having the same concept of the stems, that will enclose the small skull I have and then pulling a string to open them I already have an idea of how I can make this piece, making my own hinges and marts that I need to make it work, Hopefully, which is where Metals 2 is coming in handy.
I made a puzzle piece toy thing for metal 1 and I made most of the mechanical parts myself to make it work. I can post an image if anyone is interested in seeing what it looks like. and I can talk about that further if you are interested, or would like to know what I did to possibly give you/someone ideas on how to make something.
Another quick update I have made a sketch for how my idea for the skull may apply, along with pictures of one of my pieces from metal 1 with mechanical parts.
Update
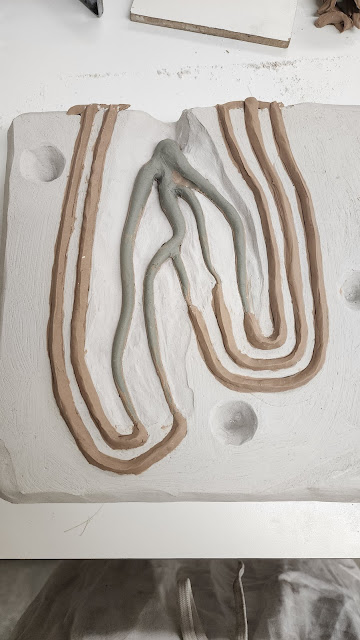
I have now cast my piece and removed the majority of the shell. I have also cut groves into the back/bottom of my piece so that will function like a gear and hinge open when pulling on a rod. I still have plenty to do however, I need to finish creating the platform it will sit on and create a stable hinge that the piece will pivot on. then stain the wood, and then earth it up a bit, like for my To Light piece.
TO HANG
For this piece, I wanted to make a headset holder that matches my style/liking. I like to play video games when I can and I like to use a headset when playing to get that immersed feeling of the game. But I never had a headset holder, and I always wanted one. Yes, I can simply place it on the countertop but it makes it look like I just tossed it there, and having the headset hanger will make it look nicer and more intentional when I'm not playing games, but as well have it be like one of those objects or weird stuff that gamers have or collect.
Where are you with the plasma cutting?
The headset holster so to say will be made of steel, or sheet metal to be exact. I would use the plasma cutter to cut out the spaces/shapes as seen below in my sketch. this will also be a formed piece that is U shaped in order to stand, and tri-pod-like feet. the part that the headset will rest on would cradle the headset band, I'm not quite sure what to make this out of that would go well with steel, I was thinking wood but I don't know what kind of wood. Pine?
After Going to Neltji's house; a talk of Damascus, and Mokume Gane, I got a large interest and making something out of Damascus, I want to do this because of the beautiful pattern that comes with this process. Though I have little to no experience assigned from watching forged in fire and relatively light research, I have the excitement of a dog getting a new toy. Though I know this will be challenging to do it is still something I want to do. I did some research, primarily Youtube, and how to make it. Like I will require two types of metal. one that is higher in carbon, and one that has less carbon but more nickel in it. Such as 1095 and 15n20 steel.
This will not happen as you have barely scratched the surface of steel work and yet want to jump to an advanced skill in blacksmithing. Let's back up and see what you can do with fabrication.
From what I could see watching shows such as Forged in fire, I could get that it is very important to clean the metal before forging it, and when restacking the layers. Another thing that helps keep the metal clean while heating up is that the flame has to burn all of the oxygen that is around it or have more gas. Which I think was called a neutral burn.
to make Damascus you have these two metals as described before and you stack them in an alternating pattern, such as 1095, 15n20, 1095, 15n20, 1095, 15n20. from this, you get layers or layer counts. taking from the layer example just mention starts with 6. then you forge weld that and use borax/flux to help prevent oxygen from getting into the welds. forming a billet with the compressed layers, you then cut it in half once drawn out, clean up, stack, and repeat. by doing these layers go up exponentially. start with 6, cut stack then you got 12 layers, then 24, then 48, then 96 and so on, the more layers the more lines and detail you will see.
Once you have the desired shape and size you heat the metal up to quenching temp. Quenching is where you dip a forged piece of hardenable metal into the oil. In which used car oil works. It will harden the metal and make it strong. to get the Lines you then dip in an Etching solution, called Ferric chloride I believe. Once you take it out which does not have to be long, you then utilize it using ammonia or water with baking soda.
This is something that I would love to do, but I don't know if all should be Damascus including the part that the headset will hang, or have it be wood.
Examples below.
Update
I have finally started on this by getting steel sheets ready to the size I need them to be to welded and then plasma cut out the shapes on the inside.
TO LIGHT
This piece is more to hold than to light, the light aspect is a side line to the focal point of the piece which is to hold these characters. To fulfill the project guidelines, I want to encourage you to utilize your cast iron piece to create a light that makes the light the focal point. Elevate the work in this class as you are in your metalsmithing work. Show me you are interested in metal versus someone else's artwork which is what these characters are. Show me what Fabian can create and showcase.
This piece is more to hold than to light, the light aspect is a side line to the focal point of the piece which is to hold these characters. To fulfill the project guidelines, I want to encourage you to utilize your cast iron piece to create a light that makes the light the focal point. Elevate the work in this class as you are in your metalsmithing work. Show me you are interested in metal versus someone else's artwork which is what these characters are. Show me what Fabian can create and showcase.
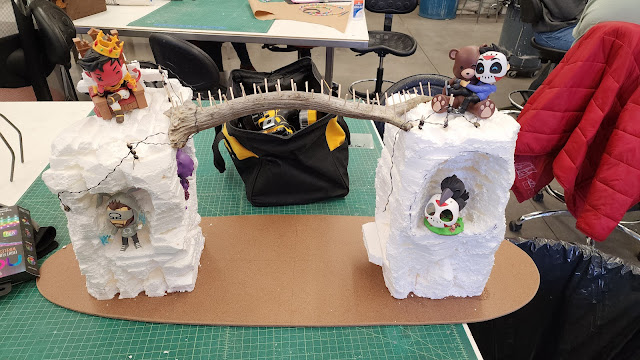
This is my to-light sketch. What I was thinking was to have a piece that will hold my anime figures and Youtube/content creator figures. The layout or landscape is somewhat related to the figures. I want it to be adventurous or active in a way that relates to the anime or the energy/personality of the figures. Since I like to game and like anime, I feel this is fitting. The light part of this lights at the bottom that points upward to light the figures and display them. I can Bring them in for size reference. I also don't know what part I should cast in Iron aside from the feet underneath the platform or the tree trunk that bridges across.
Below is the layout of how I would like to place and build the stand. on the left and to the right are towers that will hold the figures they will have slight differences in detail that seemingly correspond with the figure being placed on or around. Branching or linking the two towers is a tree trunk which will also hold figures on top, and one of them underneath it from a swing. At the front, south/bottom of my sketch will be three lights one facing to the left for the left tower, one to the right for the right tower, and one in the middle aiming at the trunk or bridge. All this will be placed on a wold platform. it will be big enough to house my Xbox under the bridge platform and between the two towers. I am doing that to help with the spacing of the countertop where my Xbox is right now. but to also integrate the gaming world into the anime, and youtube figures world or content creating and gaming.
Below are the figures that I am going to place on the platform.
In the middle photo are the anime figures that I'm using, And no I don't know their names for most nor from what anime they are, I got them because I thought they looked cool. The last photo, it is of my favorite Youtube/content creation that I like to watch. they are also like a crew that plays together.
From the middle photo, the frontmost two are Riaz, and Liz(creator of The Otaku Box)
Last photo. From left to right starting in the back, is Ohmwreker, H20Delirious, Gorillaphant, Cartoonz, CrowLirious (H20's mascot in a way), and Dead Squirrel.
Below is roughly the frontal view/layout of the platform. Not to scale. On the left side, Cartoonz, Ohm, H20, and Dead Squirrel will be placed there. On the right side Gorilla, Crowlirious, and Liz will be placed. On the tree trunk the White dress figure, red dress figure, and Riaz will be placed there.
The layout is built to fit the figures. For example, Cartoonz's figure is sitting on a throne with a crown, so his background will be a brick wall similar to a castle. Riaz will be placed on a swing as her figure is more scandalous, but also to make a connection to ________(art painting of a lady on a swing in the forest)
https://www.youtube.com/watch?v=w_A-ajCrX1I
https://www.youtube.com/watch?v=g8EAd4zOHY4
https://www.youtube.com/watch?v=Xl6OuAhz4aE
https://www.youtube.com/watch?v=l1LNvbfhOBc


.jpg)


I think all of these ideas are super interesting. I know you've started your two tower piece to display your figures. Have you considered displaying maybe your memories or art on it?
ReplyDelete